Obtaining Chatbot Configuration Information
The Chatbot window in COMSOL Multiphysics® provides a connection to a chatbot provider of your choice. The Application Programming Interface (API) key from your chosen provider is the primary requirement to configure the Chatbot window. An API key is used for authentication and billing, which varies by provider. This article covers the information required to configure the Chatbot window in COMSOL Multiphysics® and provides some examples from chatbot providers. See "Setting Up the Chatbot Window in COMSOL Multiphysics®" for installation instructions and additional resources.
Required Configuration Information
While all configurations of the Chatbot window require an API key, additional information is required depending on the provider. The configuration information can generally be obtained by logging into your provider with an authorized account. The exact process depends on your provider and may be subject to change.
| Provider | Configuration Information | Notes |
|---|---|---|
| OpenAI |
|
Use a personal or corporate OpenAI account to obtain your API key. |
| Azure OpenAI |
|
Login to your Azure portal and navigate to the Azure OpenAI Service to find your API keys and endpoint (e.g. https://{your-resource-name}.openai.azure.com/). The Azure AI Foundry will have your deployment names, which are custom and case-sensitive. The available models for Azure OpenAI can be selected from a dropdown in COMSOL Multiphysics®. |
| OpenAI API compatible |
|
Access your provider for your API key and other information. For example, Gemini uses https://generativelanguage.googleapis.com/v1beta/openai as the base URL and a model id like gemini-3-pro-preview. |
In the section below, we've outlined an example of how configuration information was obtained from OpenAI. It is subject to change and will also differ by provider.
Example Chatbot Window Configuration with OpenAI
An example of the process used to obtaining a personal API key and corporate account API key for OpenAI is shown below. It can be used as a general reference point for what to expect when obtaining the information to configure the chatbot for your selected provider. configuration information.
Obtaining Your Personal API Key
The following process is valid for scenarios where there is no centralized management of the OpenAI platform in your organization and you are allowed to use your own personal account:
- Register or Log In
- Start by visiting the OpenAI Platform. Sign up, or log in if you already have an account. Note that OpenAI's API is a separate product from ChatGPT®. Registering for an account may require a valid phone number and email.
- Set Your Organization
- Optionally, go to the Settings menu and under the Organization section, set your organization profile according to the instructions provided by OpenAI. The provided name will be displayed in the upper-left corner of the OpenAI Platform web interface. For demonstration purposes, in the screenshots below the displayed organization name is COMSOL. Note, however, that COMSOL does not provide the API key subscription. You would need to provide your own organization's name here.
- Set Up Billing
- The OpenAI API is a pay-as-you-go service. As a result, to use the chatbot tool within COMSOL Multiphysics® you must add a valid payment method and top up your credit balance. To do this, go to the Billing section under the Settings menu and follow the provided instructions.
 The billing settings are shown after logging into an account on the OpenAI Platform web interface.
A screenshot of the OpenAI Platform web interface with the menu to create a new project opened.
- Create New Project
- Optionally, in the upper-left corner of the OpenAI Platform web interface, click on the Project field, which is next to the organization name. Select the +Create project button and create a new project devoted to chatbot-related tasks. For demonstration purposes, in the screenshots below the custom project name is "for COMSOL".
 The OpenAI Platform web interface with a pop-up window that prompts you to enter a name to create a new project.
A screenshot of the OpenAI Platform web interface with the menu to create a new project opened.
- Generate the API Key
- With the newly added project selected, under the Dashboard menu go to the API keys section, click the +Create new secret key button, and then choose the Create secret key option.
 A pop-up window that prompts you to enter a name to generate a new secret API key is shown on the OpenAI Platform web interface.
A screenshot of the OpenAI Platform web interface with the menu to generate a new secret API key opened.
- Configure the API Key in COMSOL Multiphysics®
- Open a session of COMSOL Multiphysics®. From the Home ribbon tab, under the Windows button, select Chatbot to open the Chatbot window, where you will be prompted to Configure Chatbot Provider. This will open the chatbot preferences in which you supply your API key and other configuration information as needed. Click OK.
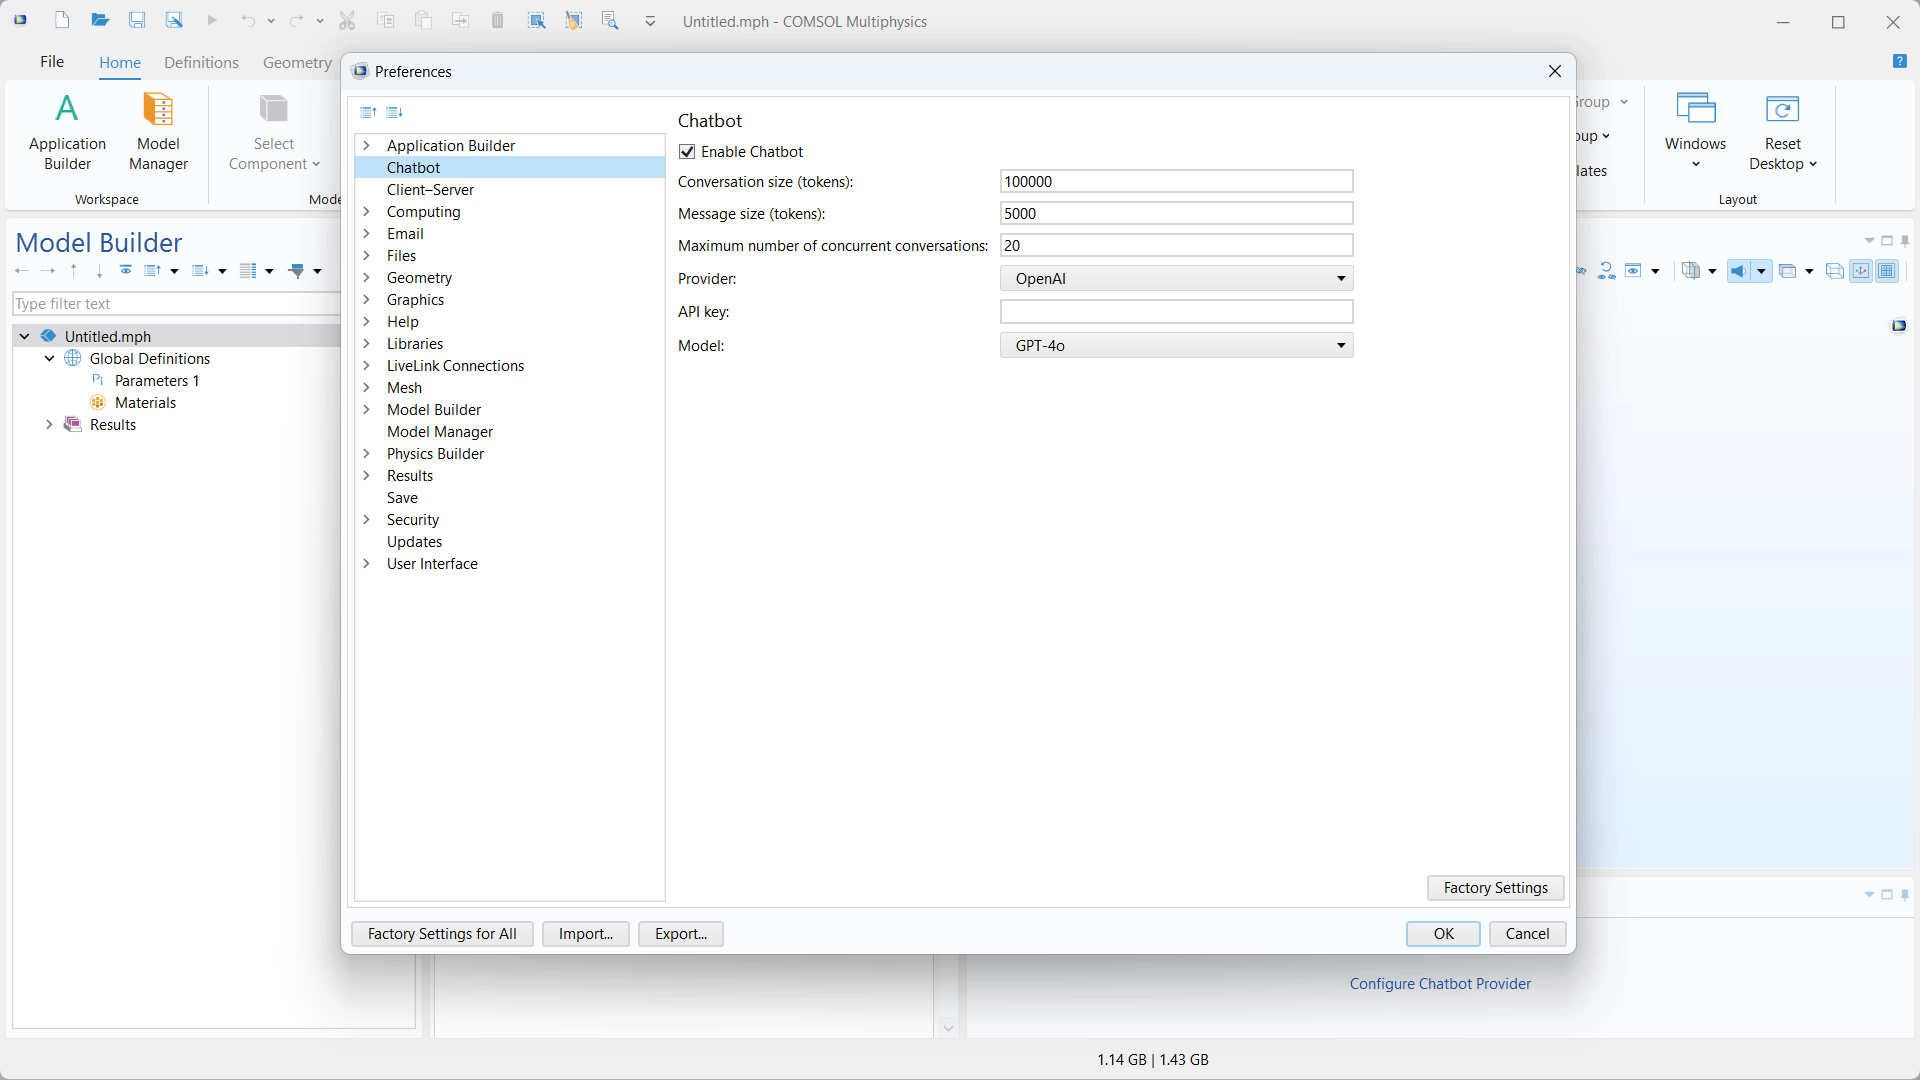 A UI screenshot of the Model Builder where the Configure Chatbot Provider dialog is open.
COMSOL Multiphysics with the Chatbot window opened and the chatbot preferences open.
You are now ready to use the Chatbot window in the software.
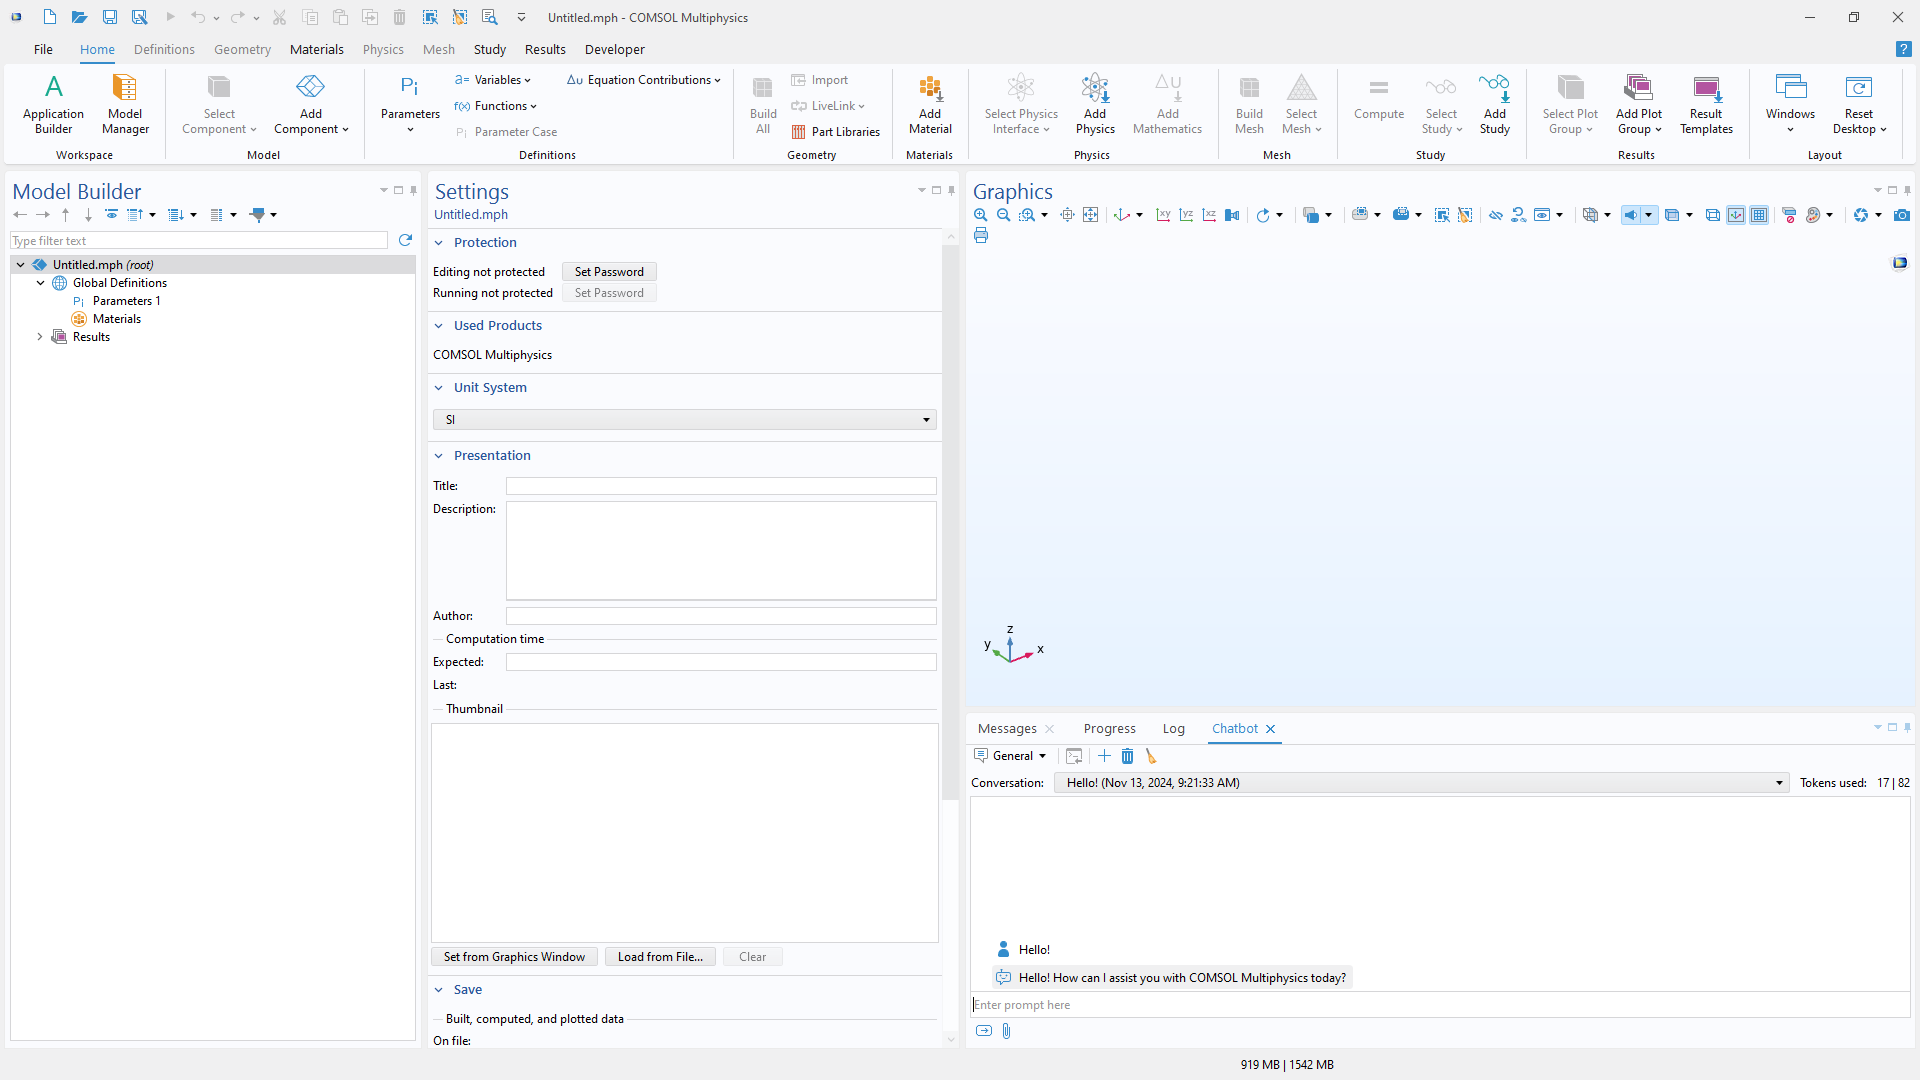 A UI screenshot of the Model Builder where the Chatbot window is opened and a general conversation has been initiated.
The COMSOL Multiphysics® UI with the Chatbot window configured with an OpenAI API key. You can update or change the API key later from the Preferences window.
Obtaining Your Corporate Account API Key
The following process is valid for scenarios where there is centralized management of the OpenAI Platform in your organization and you are supposed to be connected to a corporate account. For these cases, most steps should be performed by a manager of the corporate account; the other steps should be taken by a designated COMSOL Multiphysics® user. The process listed below indicates who should perform each step. The first four steps are identical to that of when obtaining a personal account API key but should be performed by the manager.
- Register or Log In (manager)
- Start by visiting the OpenAI Platform. Sign up, or log in if you already have an account. Note that OpenAI's API is a separate product from ChatGPT®. Registering for an account may require a valid phone number and email.
- Set Your Organization (manager)
- Optionally, go to the Settings menu and under the Organization section, set your organization profile according to the instructions provided by OpenAI. The provided name will be displayed in the upper-left corner of the OpenAI Platform web interface. For demonstration purposes, in the screenshots below the displayed organization name is COMSOL.
- Set Up Billing (manager)
- The OpenAI API is a pay-as-you-go service. As a result, to use the chatbot tool within COMSOL Multiphysics® you must add a valid payment method and top up your credit balance. To do this, go to the Billing section under the Settings menu and follow the instructions provided.
The billing settings are shown after logging into an account on the OpenAI Platform web interface.
A screenshot of the OpenAI Platform web interface with the Billing section of the settings opened. A valid payment method is added and the credit balance is recharged.
- Create New Project (manager)
- Optionally, in the upper-left corner of the OpenAI Platform web interface, click on the Project field, which is next to the organization name. Select the +Create project button and create a new project devoted to chatbot-related tasks. For demonstration purposes, in the screenshots below the custom project name is "for COMSOL".
A pop-up window that prompts you to enter a name to create a new project is shown on the OpenAI Platform web interface.
A screenshot of the OpenAI Platform web interface with the menu to create a new project opened.
- Invite Team Members (manager)
- Under the Settings menu, in the Organization section, go to the Members section, click the +Invite button, and send an invitation link to a designated colleague who is going to use the chatbot functionality. Select an appropriate role following the instructions provided by OpenAI.
 A pop-up window that prompts you to enter an email address and specify a role for team members you want to invite to the new project created on the OpenAI Platform web interface.
A screenshot of the OpenAI Platform web interface with the dialog to invite a new team member to an organization.
- Accept Invite and Register or Log In (COMSOL Multiphysics® user)
- Accept the invitation sent by the corporate account manager to your email. In the OpenAI Platform, sign up, or log in if you already have an account. Note that OpenAI's API is a separate product from ChatGPT®. The registration may require a valid phone number and email.
- Add Members to Project (manager)
- In the OpenAI Platform, select the project devoted to tasks related to COMSOL Multiphysics®. Go to Settings, then Project, and in the Members section, click the +Add Member Button operation. Select an appropriate team member from the menu and click the Add button. Note that only the names of members who have already accepted an invitation and have an OpenAI Platform account are displayed. Choose an appropriate role following the instructions provided by OpenAI.
 A pop-up window that prompts you to add team members to the new project created on the OpenAI Platform web interface.
A screenshot of the OpenAI Platform web interface with the dialog to add a new team member to a project.
- Generate the API Key (COMSOL Multiphysics® user)
- In the OpenAI Platform web interface, select your organization and the project you have been added to. Then, go to the Dashboard menu and select the API keys section. Click the +Create new secret key button, and then click the Create secret key option.
The OpenAI Platform web interface showing a pop-up window that prompts you to enter a name to generate a new secret API key.
A screenshot of the OpenAI Platform web interface with the menu to generate a new secret API key.
- Configure the API Key in COMSOL Multiphysics® (COMSOL Multiphysics® user)
- Open a session of COMSOL Multiphysics®. From the Home ribbon tab, under the Windows button, select Chatbot to open the Chatbot window, where you will be prompted to Configure Chatbot Provider. This will open the chatbot preferences in which you supply your API key and other configuration information as needed. Click OK.
A UI screenshot of the Model Builder where the Configure Chatbot Provider dialog is open.
COMSOL Multiphysics with the Chatbot window opened and the chatbot preferences open.
You are now ready to use the Chatbot window in the software.
 A UI screenshot of the Model Builder where the Chatbot window is opened and a programming conversation has been initiated.
The COMSOL Multiphysics® UI with the Chatbot window configured and displaying part of a conversation. Here, the generated code can easily be sent to the Java Shell window, where it can be run to define a new Analytic function node in the model tree.
ChatGPT is a registered trademark of OpenAI, Inc.
Java is a registered trademark of Oracle and/or its affiliates.
Microsoft and Windows are trademarks of the Microsoft group of companies.
このページに関するフィードバックを送信, または サポートに連絡 してください.