
新しいモデルファイルを作成するたびに, 同じモデリング操作を何度も繰り返し実行していることはありませんか? あるいは, 同僚から送られてきたモデルファイルに, 手動で物理特性や機能を追加しなければならないことはありませんか? もしそうなら, COMSOL Multiphysics® ソフトウェアバージョン 5.3 の新機能であるメソッドを使用することで, ワークフローを大幅に高速化できます. その方法を見ていきましょう.
COMSOL Multiphysics® でメソッドを手動で作成
以前のブログで ランダムジオメトリの作成 について説明したように, メソッドを記録 機能を使用すると, COMSOL Multiphysics グラフィカルユーザーインターフェース (GUI) 内で実行している一連の操作を記録し, そのメソッドを再生して同じ手順を再現することができます. もちろん, 既にファイルを作成している場合は, この方法は役に立ちません. ファイル全体を再度記録し直すのは避けたいからです. しかし, COMSOL Multiphysics は, モデルファイル内で実行したすべての操作の履歴を Java® コードとして自動的に保存します. このコードから関連する操作を直接抽出し, 新しいメソッドに挿入することができます.
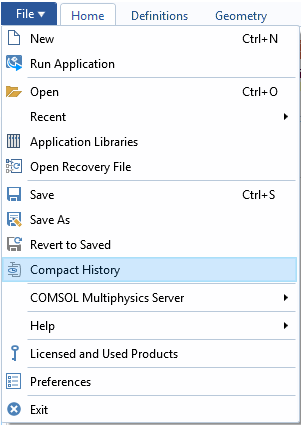
履歴をコンパクト化 オプション.
ファイル内のすべての操作の履歴を抽出するには, いくつかの手順が必要です. まず, ファイル メニューに移動し, 履歴をコンパクト化 オプションを選択します. COMSOL Multiphysics はすべてのコマンドの履歴を保持していますが, ここでは既存のモデルを生成するために使用された最小限のコマンドセットのみが必要なためです. 次に, ファイル メニュー > > 名前を付けて保存 を選択し, Java 用モデルファイル ファイル形式で保存します. これで, Java® コードを含むテキストファイルが作成されます. 実際に試してみて, 作成されたファイルをテキストエディターで開いてみてください. このファイルの先頭と末尾には, 以下に示すようなコード行が必ず含まれています:
/*example_model.java */
import com.comsol.model.*;
import com.comsol.model.util.*;
public class example_model {
  public static Model run() {
    Model model = ModelUtil.create("Model");
    model.modelPath("C:\\Temp");
    model.label("example_model.mph");
    model.comments("This is an example model");
         ...
         ... /* Lines of code describing the model contents */
         ...
     return model;
 }
 public static void main(String[] args) { run();}
}
上記のコードスニペットは, 削除できる部分を示しています. Model model = ModelUtil.create("Model"); と return model; の間のコードのみが, モデル内のすべての機能の定義に使用されています. 実際には, model.modelPath();, model.label();, model.comments(); の行も削除できます. テキストエディターでこれらのコード行をすべて削除すると, メソッド内でモデルを再現するために必要なコマンドセットだけが残ります.
次に, 新しい空のモデルファイルを開き, アプリケーションビルダーに移動して新しいメソッドを作成します. 編集した Java® ファイルのすべての行をこの新しいメソッドにコピーします. 次に, モデルビルダーに戻り, デベロッパー タブに移動して モデルメソッドを実行 を選択し, このコードを実行します. このメソッドを実行すると, モデルの解析を含む, 元のファイルのすべてのステップが再現されます. モデルの解析には長い時間がかかる場合があるため, メソッドを短縮することがよくあります.
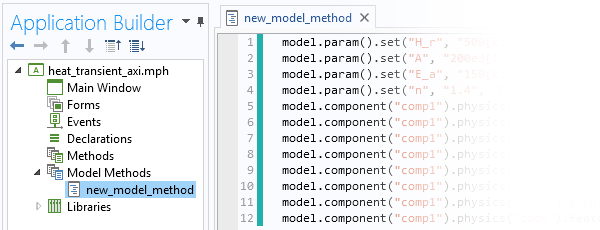
アプリケーションビルダー内のメソッド.
メソッドのトリミング
コードをトリミングするには, 2つの方法があります. 1つ目は, Java® コード自体を手動で編集し, 再実行したくないコードを削除する方法です. この方法を使用する場合は, COMSOL Programming Reference Manual を手元に用意しておくと便利です. 削除する前に, 各行の動作を把握しておく必要がある場合があるからです. 2つ目は, より簡単な方法で, COMSOL Multiphysics GUI 内で直接機能を削除する方法です. 元のモデルファイルのコピーを作成し, メソッド内に表示したくないものをすべて削除します. ジオメトリシーケンス, メッシュ, スタディステップ, 結果の可視化など, 再現したくないものはすべて削除できます.
簡単な例を見てみましょう. 熱硬化をシミュレートするモデルを作成し, この熱硬化シミュレーションを, 既に熱伝達シミュレーションが設定されている他の既存モデルに組み込みたいとします.
以前のブログで説明したように, 熱伝達に加えて 熱硬化をモデル化 するには, 次の3つのステップが必要です:
- 材料パラメーターのセットを定義する
- 硬化の経時変化をモデル化するための ドメイン ODE インターフェースを追加する
- 硬化反応熱を熱問題に連成する
これらのステップだけを含むモデルを GUI で構築し, Java® ファイルを書き出すことができます. もちろん, 手動で編集する必要もありますし, Application Programming Guide を参照して基本を理解することも役立ちます. しかし, すべての構文に慣れれば, GUI 内の上記の3つのステップは, ここに示す方法で記述できることがわかります:
model.param().set("H_r", "500[kJ/kg]", "Total Heat of Reaction");
model.param().set("A", "200e3[1/s]", "Frequency Factor");
model.param().set("E_a", "150[kJ/mol]", "Activation Energy");
model.param().set("n", "1.4", "Order of Reaction");
model.component("comp1").physics("ht").create("hsNEW", "HeatSource");
model.component("comp1").physics("ht").feature("hsNEW").selection().all();
model.component("comp1").physics("ht").feature("hsNEW").set("Q0", "-ht.rho*H_r*d(alpha,t)");
model.component("comp1").physics().create("dode", "DomainODE", "geom1");
model.component("comp1").physics("dode").field("dimensionless").field("alpha");
model.component("comp1").physics("dode").field("dimensionless").component(new String[]{"alpha"});
model.component("comp1").physics("dode").prop("Units").set("SourceTermQuantity", "frequency");
model.component("comp1").physics("dode").feature("dode1").set("f", "A*exp(-E_a/R_const/T)*(1-alpha)^n");
このコードスニペットの最初の4行は, 追加のグローバルパラメーターセットを定義しています. 次の3行は, 既存の 伝熱 インターフェース (タグ ht) に熱源ドメイン機能を追加し, 熱源項を定義して, すべてのドメインに熱源を適用します. 最後の5行は, モデル内のすべてのドメインにデフォルトで適用される ドメイン ODE インターフェースを設定し, 変数名, 単位, および解くべき方程式を設定します.

デベロッパー タブからメソッドを実行します.
上記のメソッドは, 既に熱伝達解析が設定されているファイルでも実行できます. 例えば, COMSOL Multiphysics のアプリケーションライブラリにある 軸対称過渡熱伝達 チュートリアルにこのメソッドを追加して実行してみてください. その後, モデルを再解析して温度と硬化度の両方を計算できます.
上記のコードスニペットには, いくつかの前提条件があります:
- モデル内のすべてのドメインで硬化をモデル化したい
- タグ comp1 を持つコンポーネントが既に存在し, これにフィジックスインターフェースを追加できる
- そのコンポーネントには, タグ dode を持つ ドメイン ODE インターフェースがまだ存在しない
- 温度変数は T として定義されており, ドメイン ODE インターフェースで使用できる
- タグ ht を持つ伝熱フィジックスインターフェースが既に存在し, それにタグ hsNEW を持つ機能を追加できる
もちろん, 独自のメソッドを開発する際には, このような一般的な論理的問題を認識し, 対処できる必要があります.
メソッドに関するまとめ
このシンプルな例から, COMSOL Multiphysics のモデリングプロセスのあらゆる部分で再利用可能なテンプレートとして機能するメソッドを作成できることもわかります. このようなテンプレートメソッドは, 作成するすべての新規ファイルで実行し, カスタム材料特性セットを読み込んだり, 複雑なフィジックスインターフェースを設定したり, 複雑な式セットを定義したりする必要がある場合などに使用できます. 既存のファイルで同じメソッドを再利用して, 特定のカスタマイズされたスタディタイプを設定したり, ソルバー設定を変更したり, 何度も再利用する予定の結果の可視化を定義したりすることもできます.
このワークフローの基本に慣れれば, 多くの時間を節約できることに気づくでしょう. ぜひその利便性を実感してください!
モデルメソッドのその他の使用方法について学ぶ
- COMSOL Multiphysics® でランダムサーフェスを生成する方法
- COMSOL Multiphysics® でギアボックスの振動と騒音をモデル化する方法
- メソッドを使用してランダムジオメトリを作成する方法
Oracle および Java は, Oracle および/またはその関連会社の登録商標です.
コメント (0)